Worn and abraided wiresWear, due to friction on sheaves, rollers, drums, etc., eventually causes outer wire abrasion. Before any inspection is made, determine what type of wire rope you have in service. Many of today’s wire ropes are ‘compacted’, ‘calibrated’, or ‘die formed’. This manufacturing process purposely flattens the outer wires and for an inexperienced inspector these ropes may appear to be already abraded when indeed they are brand new. If you are in doubt about what type of rope you are about to inspect, have a look at a section of the rope which was not subjected to any abrasive work; e.g. like the safety wraps on the drum or a section just behind the end connection. The round outer wires of standard wire rope will become flat on the outside due to friction when in contact with drums, sheaves, or other abrasive matter like sand or gravel. This is part of normal service deterioration and in most crane installations relatively even abrasion will occur. The rope must be replaced, however, if this wear exceeds 1/3 of the diameter of the wire. It is good practice to compare a section of the rope which was NOT subjected to any bending work (e.g. the safety wraps, or a short section behind the end fitting) to the rope section to be inspected. The same applies when evaluating any possible reduced rope diameter during service. (See next column.) |
Reduction in Rope DiameterAs already discussed on the ‘Measuring the rope diameter‘ page and on the ‘Break-In-Period‘ page, shortly after installation, the wire rope diameter will slightly decrease. This is normal and is caused by the adjustment of all rope elements when loaded the first time. To evaluate the diameter reduction, you have to measure the rope when new, and you also have to measure the rope after the break in period at a specified load. This gives you a good indication of the magnitude of the initial diameter reduction in your specific application. The diameter reading you took after the break in period should now become your ‘gauge’. Do not compare the rope diameter you are about to take with the ‘catalogue’ diameter. It may give you a false indication, since wire rope may have a plus tolerance of up to 4% to 5% over the ‘catalogue’ diameter. If you detect a further diameter reduction when measuring the rope under the same load condition as after the break in period, it is often due to excessive abrasion of the outside wires, loss of core support, internal or external corrosion, inner wire failures, and/or inner wire abrasion. However, there will always be a normal continuous small decrease in diameter throughout the rope’s service life. Core deterioration, when it occurs, is revealed by a more rapid reduction in diameter, and when observed, it is time for removal. Deciding whether or not a rope is safe is not always a simple matter. A number of different but interrelated conditions must be evaluated. It would be dangerously unwise for an inspector to declare a rope ‘safe’ for continued service simply because its diameter had not reached a certain minimum diameter if, at the same time, other observations led to a different conclusion. However, ASME, ISO 4309, CSA, other Canadian Provincial H&SA and USA OSHA Regulation have various values published for maximum allowable diameter reductions. They are somewhat confusing as they show diameter reduction values from 3.5% to 9%, and some give reduction values in inch fractions depending on rope nominal diameter.
|
|
 |
When the surface wires are worn by 1/3 or more of their diameter the rope must be replaced. | |
 |
Abrasion caused by dragging the rope over a sharp object (steel corner, sharp plate, abrasive surface etc.) | |
 |
Peening and subsequent wire break caused by high fleet angle and rope vibration. | |
 |
Rope abrasion caused by normal operating condition on a high cycle crane. Rope must be retired. | |
Archive for the ‘Technical Information’ Category
 Take measurement of rope diameter AFTER the
Number of Broken Wire Discard Tables
Broken Wire Criteria Indicating Rope Removal
| Based on ASME B30.30-2019 | ||||||||
|---|---|---|---|---|---|---|---|---|
| Over Length of 6 x Nominal Rope Diameter |
Over a Length of 30 x Nominal Rope Diameter |
|||||||
| B30.30 Rope Type |
Standard and Python® Rope Construction |
Within a Single Strand |
Across All Strands |
Across All Strandsy |
Of the Valley Break Type 1 |
At End Termination 2 |
||
| Running Rope | ||||||||
| ≤ 6 strands, 19 class | 6×19, 4-Runner | 3 | 6 | 12 | 2 | 2 | ||
| > 6 strands, 19 class | Super 8R, 8V, 8C, 8CD, Power 9, Ultra | 4 | 8 | 16 | 2 | 2 | ||
| ≤ 6 strands, 36 class | 6×36 | 5 | 10 | 20 | 2 | 2 | ||
| > 6 strands, 36 class | 8×36 | 6 | 12 | 24 | 2 | 2 | ||
| Rotation Resistant | ||||||||
| Category 1 | Compac 35, Compac 35P | N/A | 6 | 12 | 2 | 2 | ||
| Category 2 | 19×7, 19×19, Compac 18 | N/A | 2 | 4 | 2 | 2 | ||
| Category 3 | Multi | N/A | 2 | 4 | 2 | 2 | ||
| Standing Rope | ||||||||
| ALL | — | 3 | — | — | 2 | |||
|
GENERAL NOTE: Broken wire rope-removal criteria cited in B30.30 apply to wire rope operating on steel sheaves and cast iron sheaves and drums and wire rope operating on multilayer drums, regardless of sheave material. When drum spooling is single layer, synthetic or sheaves with synthetic linings should not be used because there are no broken wire criteria for this configuration, and internal wire breaks may occur in large numbers before any break or signs of substantial wear are visible on the outside wires of the rope.
Notes: 2) Broken wire at end terminations may be eliminated by cutting and reattaching the end termination, if reducing the length is allowable. |
||||||||
Rope Removal and possible Cause
| Fault | Possible Cause |
|---|---|
| Accelerated Wear |
|
| Rapid Appearance of Broken Wires |
|
| Corrosion |
|
| Kinks |
|
| Excessive Localized Wear |
|
| Stretch |
|
| Broken Wires Near Fitting |
|
| Sheaves/Drums Wear Out |
|
| Pinching, Crushing, Oval Shape |
|
| Rope Unlays (Opens Up) |
|
| Reduction in Diameter |
|
| Bird Cage |
|
| Core Protrusion |
|
Crown and Valley Wire Breaks
Under normal operating conditions single wires will break due to material fatigue on the CROWN of a strand. ALL wire rope removal/retirement criteria are based on FATIGUE wire breaks located at the CROWN of a strand. (Click here for additional details.).
How to Inspect Wire Rope
GeneralIt is essential to maintain a well planned program of periodic inspections. In most cases there are statutory and/or regulatory agencies whose requirements must be adhered to. Whether or not such requirements exist in your specific environment, you can be guided by the suggested procedures that follows. Abrasion, Bending and Crushing represent the ABC‘s of wire rope abuse, and it is the primary goal of good inspection practice to discover such conditions with minimum effort. When any degradation indicates a loss of original rope strength, a decision must be made quickly to allow the rope to remain in service. Such a decision can only be made by an experienced inspector. His determination will be based on:
|
Broken WiresShortly after installation
During wire rope service (Fatigue Breaks) |

Areas to examine (Based on ISO 4309)
|
 |
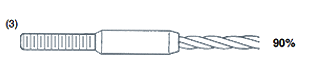
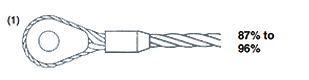
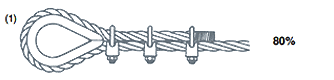
Efficiency Ratings of End Terminations
|
This page lists several types of end terminations used for overhead lifting applications. All efficiency ratings are based on the difference between the actual breaking strength of a rope and the attained breaking strength with that specific fittings. The only fitting which will attain a 100% efficiency are spelter sockets; provided they are properly attached. |
ALL other fittings are swaged or clamped onto the rope. The swaging or clamping process compresses the rope to varying degrees causing a slight loss of strength. Some publications refer to ‘100%’ efficiency with swaged sockets. Bear in mind, that most wire ropes have an actual breaking strength up to approximately 5%-15% HIGHER than the breaking strength listed in catalogue tables. In other words: a fitting having an efficiency rating of 90% may very well develop 100% of the rope’s CATALOGUE breaking strength because the rope’s ACTUAL breaking may very well be 5%–15% higher. |
 |
 |
| DIN 3093 Aluminum Splice with HD Thimble | Open Swaged Socket |
 |
 |
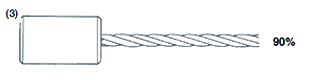
| DIN 3093 Aluminum Splice with Solid Thimble | Closed Swaged Socket |
 |
 |
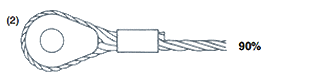
| Flemish Eye with steel sleeve | UNI-LOC™ Button |
 |
 |
| Flemish Eye with steel sleeve and HD Thimble | UNI-LOC™ Threaded Stud |
 |
 |
| Flemish Eye with steel sleeve and Solid Thimble | Forged Wire Rope Clips |
 |
 |
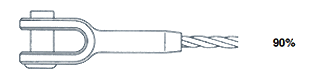
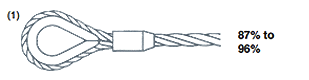
| Open Spelter Socket (Closed not shown) | Wedge Socket |
(1) Use only with 6-strand wire rope. Efficiency rating depends on rope size and core type.
(2) Meets EN13411
(3) Fabrication efficiency depends on fitting dimensions. Ask for information on UNI-LOC™ Assemblies.
Using Your Rope for the First Time
| Run-In Period After installing a new rope it is necessary to run it through its operating cycle several times under light load and at reduced speed. This allows the rope to adjust itself to the working conditions and enable all strands and wires to become seated. Depending on rope type and construction some rope stretch and a slight reduction in rope diameter will occur as the strands and core are compacted. The rope is less liable to be damaged when full load is applied. The initial stretch (constructional stretch) is a permanent elongation that takes place due to slight lengthening of the rope lay and due to a slight decrease in rope diameter. Constructional stretch generally takes place during the first 10-20 lifts, and increases the rope length by between 1/2% for fiber core rope, approx. 1/4% for 6-strand steel core rope, and approaches zero for compacted Python® ropes. If you have the chance and the equipment configuration allows this, disconnect the rope end after the run-in-period to allow any possible torque and twists which may have developed during installation and the run-in-period to be released at the end connection. |
Equipment Testing In many cases the crane equipment has to be tested prior to use. Proof testing requires to purposely overload the crane to varying degrees. The magnitude of overloading depends on the type and capacity of the crane and which governing authority certifies the equipment. The test may impose an overload of between 10% and 100% of the crane’s rated capacity. Under NO circumstances must the crane be tested prior to the break in procedure of the wire rope. If you overload a rope which has not yet been broken in, you may inflict permanent damage to the rope. Equipment with multiple layer windings call for additional caution. As mentioned before, severe overloads of the top layers may damage the lower ones or may crush the rope. If possible, test the crane with the rope spooled in the first drum layer only. If the crane is equipped with a smooth drum, special care must be taken to ensure that the rope does not cross-wind over itself when testing the crane. After testing (overloading) you have to repeat the spooling procedure as outlined here ‘Winding on smooth or flat faced drums’. |
 |
| Start with light loads and increase gradually to full capacity. |
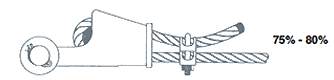
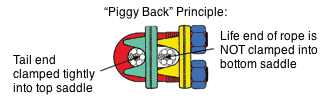
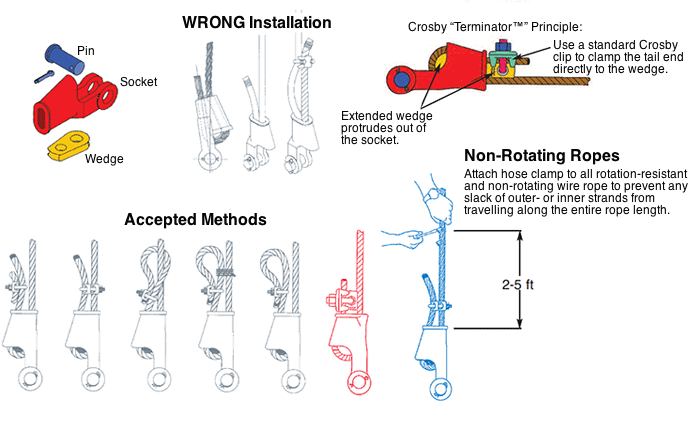
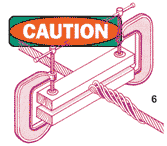
Installation of Wedge Sockets
| End terminations with wedge sockets are most popular with tower and mobile cranes although they do not generate as high as an strength efficiency rating as swaged sleeves, swaged sockets, or spelter sockets.
Depending on rope construction and type, their efficiency rating ranges between 75% and 80%. For detailed information ask the manufacturer of your wedge socket. The installation of Python® rope into wedge sockets is similar to that of 6- or 8-strand wire rope. Here’s a quick run down of some of the do’s and dont’s:
|
|
 Caution Caution |
Never use a wedge made by a different manufacturer than the socket. |
Winding the Rope onto a Multiple Layer Drum System
|
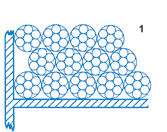
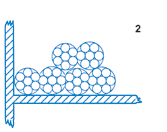
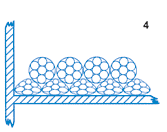
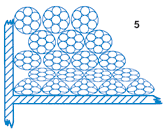
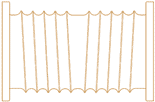
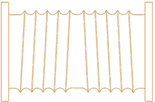
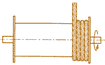
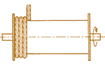
Winding on smooth or flat faced drums The first layer must be wound tight and under tension. Take a mallet or a piece of wood and tap the wraps tightly against each other (see picture 1); but not so tight that the rope strands interlock (see picture 2), but tight enough that the rope can’t be shifted on the drum. If the first layer is wound too loose, the next layer will wedge a gap into the first layer causing that layer to ‘pull in’ (see picture 3). A too tightly wrapped first layer will not allow the next layers enough space between wraps (see picture 2). In any case, the first layer, as well as all of the layers, must be wound on to the drum with sufficient pre-tension (5-10% of the rope’s WLL is a good measure). If wound with no tension at all, the rope is subjected to premature crushing and flattening caused by the ‘under load’ top layers (see picture 4). Even if wound on properly during installation, the first layer will loosen somewhat during service. When the first layer becomes slack (the pre-tension is gone), this initial procedure MUST be repeated in regular intervals. Otherwise, the tensioned ‘hard’ wraps will severely crush the bottom layers (picture 5). |
Winding on grooved drums If the first layer, or layers, are only used from time to time, they will loose their tension on the drum and start to flatten out due to the high pressures of the loaded layers. Repeat this pre-tensioning procedure regularly. As with tower cranes, for example, which have a long rope length installed and rise as the building goes up, pre-tensioning will not be possible. In these cases it may be advisable to install a shorter rope length first. Otherwise, you may have to replace the entire rope length because of crushing and flattening of the bottom layers. If this not possible, extra care must be taken to pre-tension the rope on the drum during installation. Whatever you do, DO NOT run the rope through a ‘tightening’ device (see picture 6), e.g. two wooden blocks clamped together. YOU WILL DESTROY |
 |
 |
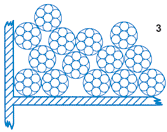 |
| Proper winding on drum. Rope does not interlock and has enough pre-tension not to damage the bottom layers. | Rope wraps have been tapped too much together. Note the resulting strand interlocking. The rope will get damaged. | Rope wraps have gaps on first layer. Note that the top layers will not spool properly. The rope “pulls in”. |
 |
 |
 |
| Bottom layer was not wound on the drum with enough tension. This layer will get crushed by the top layer when loaded to WLL. | Layers were not unspooled and pre-tensioned during service. Bottom layers will flatten out by the load imposed by the top windings. | This method of tightening the rope on to the drum WILL destroy the rope. |
 |
 |
|
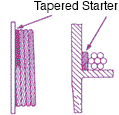
| This tapered lifter provides a ramp for the rope to ride up the flange to prevent wedging the rope against the flange and adjacent wraps. |
Rope Lay Direction Versus Drum Grooving
|
Be sure to use the correct rope lay direction for the drum. This applies to smooth, as well as to grooved drums. Many crane models have a two sided grooved drum, one part of it is left, the other right lay grooved. Some wire ropes are more sensitive to this type of design than others; it depends on lifting height, frequency of use, and even the rope diameter as to the type of wire rope most suitable for that application. In some applications it may be advisable to select the rope lay direction according to the most frequently used drum layers. If the first rope layer on a drum is used as a ‘guide layer’ only, it may be advisable to select the rope lay direction according to the second layer.
|
|
||||||||||||||||||||||||||||||||||


Connecting the Old Rope to the New Rope
|
Depending on the type of rope several accepted methods are available. Welding If installing Python® wire rope as well as all non-rotating types we do not recommend the welding procedure. Welding might damage the seizings and the rope may unravel getting damaged beyond repair. Becket Loops |
Use of Cable GripsThe most common method to install a wire rope. The type of cable grip depends on the rope type and construction. Non-rotating rope must be installed with a swivel between old and new ropes. The old rope may have developed torque during it’s working life and we must ensure that this torque is not transferred to the new rope. Python® types Multi and Super 8 may be installed with a swivel. In fact, if you have to change either of these constructions for a 6-strand rope, particularly when this rope has a different lay direction, a swivel is of definite benefit. Python® Power 9 and Python® Ultra must not be installed with a swivel. Doing so will unlay the rope and damage it beyond repair. Use two cable grips and connect them with an auxiliary cable. 
When using cable grips, the end of the grips have to be tightly seized on to the rope body to prevent accidental slip-out of the rope. Alternately, you may wrap the grip end with a strong reinforced industrial strength adhesive tape. |
Factory Induction Welded and Tapered End.
![]()
Becket Loop End.
![]()
Wire Rope welded together. Danger of the weld breaking when bent around sheaves.
![]()
Two cable grips with eye, connected to two ropes with connecting cable. Use with standard and Python® non-rotating rope.
![]()
Two cable grips with eye, connected to two ropes with a swivel. Use with non-rotating rope.
![]()
One cable grip connected to old rope, becket loop factory installed to new rope.
![]()
Open-end cable grip connected to two ropes. Commonly used with a 6-strand rope.
![]()
|
|
NEVER attach a RIGHT hand lay rope to a LEFT hand lay rope either welded together or without a swivel between them! |